
What is SSL?
SSL stands for Secure Sockets Layer and it is the standard technology for keeping an internet connection secure. The HTTPS you see appearing in the URL indicates that the website is secured by a SSL certificate.
In simple terms, your site visitors and customers are at a higher risk of having their data stolen if they don’t have a SSL. SSL protects websites from phishing scams, data breaches, and it ultimately builds a secure environment for both visitors and site owners. There are several plugins on WordPress to handle SSL with various pricing plans. However, we’re going to be showing you how to swap to Ezoic’s Cloud Integration to handle SSL for free!
Really Simple SSL
Really Simple SSL is a great example of a very popular light weight plugin. The plugin requires no setup in making your site SSL proof and there are pricing plans ranging from $29 for a single license all the way to $159 for an agency plan. However, publishers who connect to the platform using Ezoic Cloud Integration can benefit from free SSL on both original and Ezoic versions of their domain! To get started, let’s start by disabling the Really Simple SSL plugin from your WordPress website.
Head over your WordPress Admin dashboard and click plugins.
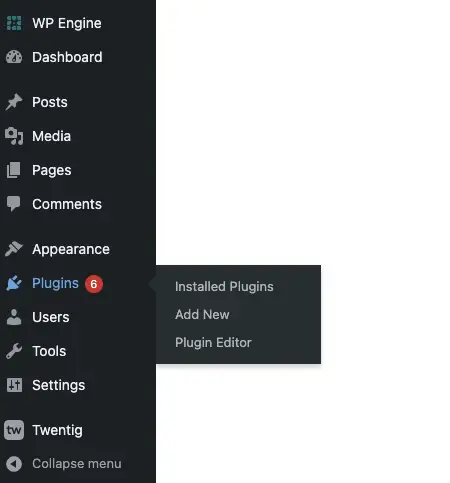
Go to installed plugins and look for the Really Simple SSL plugin. Go ahead and click Deactivate.

If you have not yet enabled SSL in Really Simple SSL, deactivating the plugin will do nothing except deactivating the plugin itself. If you have enabled SSL, when you click “deactivate” you will get a popup which offers you two options:
1. Deactivate and revert to http
2. Deactivate, and keep https
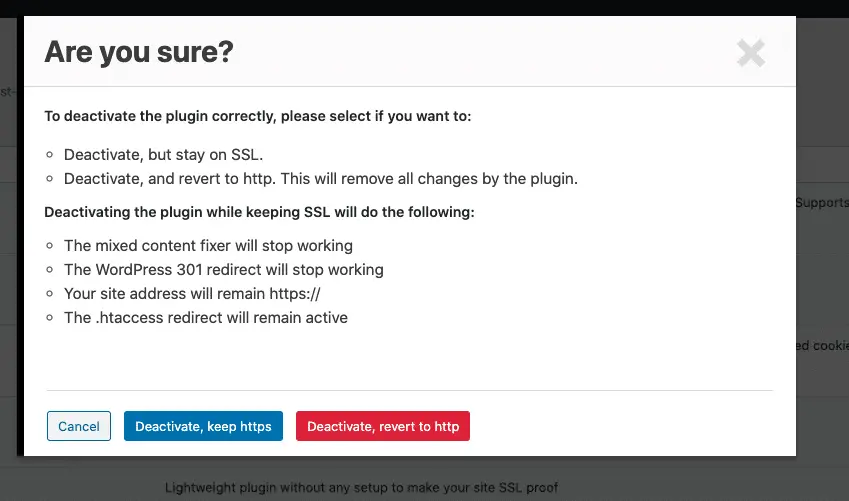
Deactivating and revert to http
Most users that do this want to do this because their site has issues on SSL and expect the plugin to leave the site as it was before activation. If you choose this option, your site url will change back to http.
Deactivating and keeping https
If you choose this option, only the plugin will deactivate, and your site will stay as.
How to get free SSL with Ezoic Cloud Integration
Let’s get started! To use any of Ezoic’s features you must first connect your site to Ezoic’s platform. When you log in to your dashboard, you’ll see the steps to get started. The first step you will see is “Integrate Your Site”
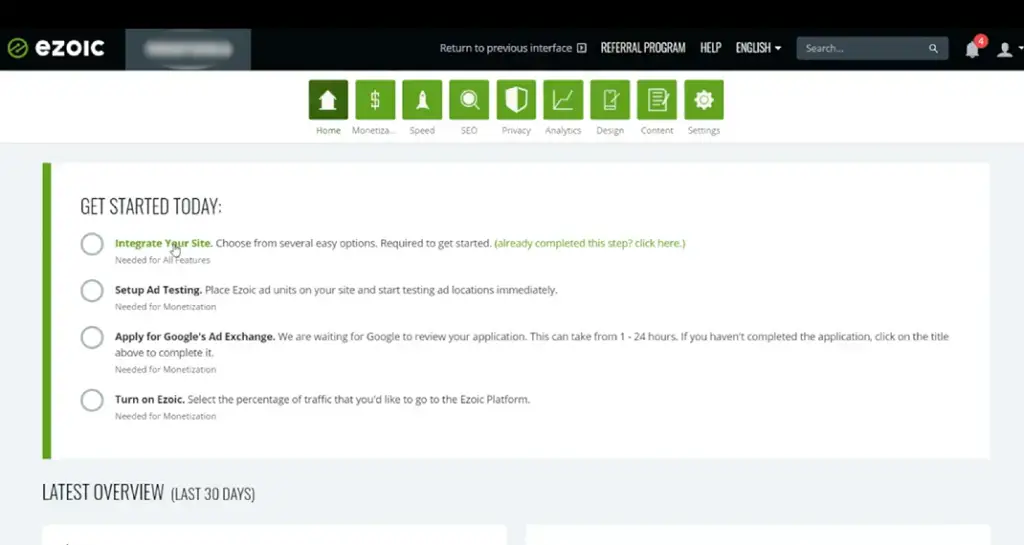
You can also go to the settings tab and just click on integration as well.
Option 1: Ezoic Cloud Integration through Name Servers
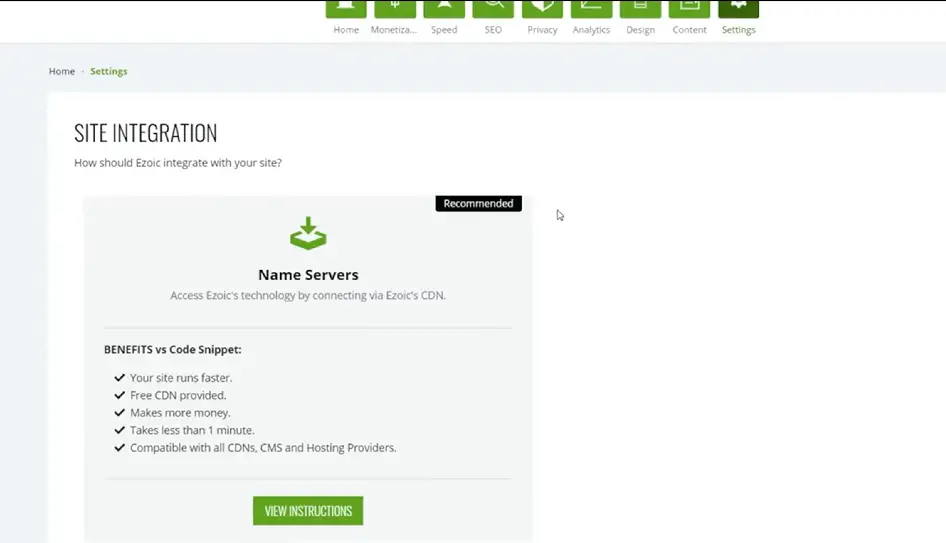
Connecting via Name Servers is the most popular way of completing the Cloud Integration. You will see this as the first option under site integration and this option allows you to connect to Ezoic’s technology via CDN. The benefits of connecting via Name Server Integration is that our system acts like a proxy which means that we can optimize the ad layouts for the user in real time server side rather than slowing through client side. This results in improved speed, optimal performance, and the best UX. Go ahead and click view instructions.
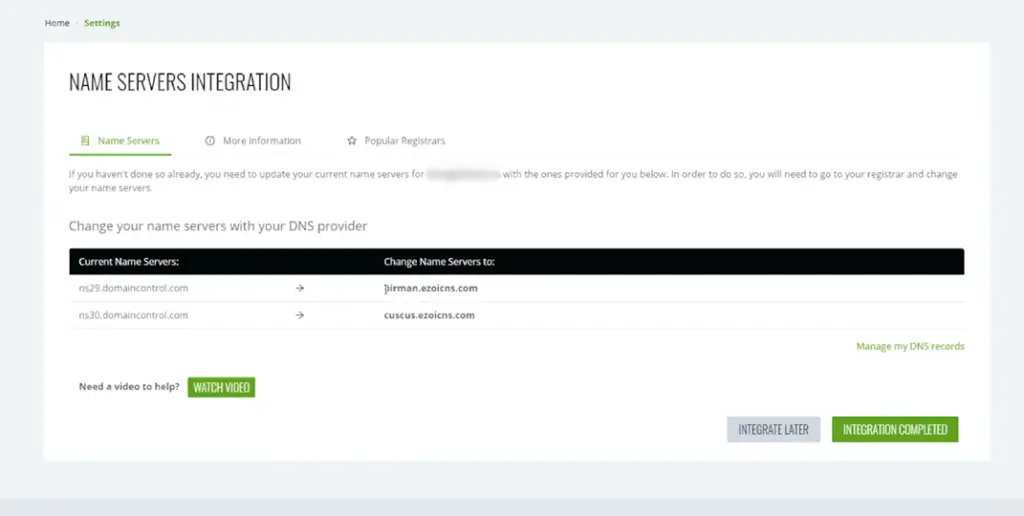
The system will pull up custom name servers that it generated for your website and you can see your current name servers and what you need to change to. Next, log in to your domain registrar and replace your existing name servers with the Ezoic’s name servers. Ezoic uses AWS (Amazon Web Services) and we provide an additional layer of caching to the site to improve speed and user experience.
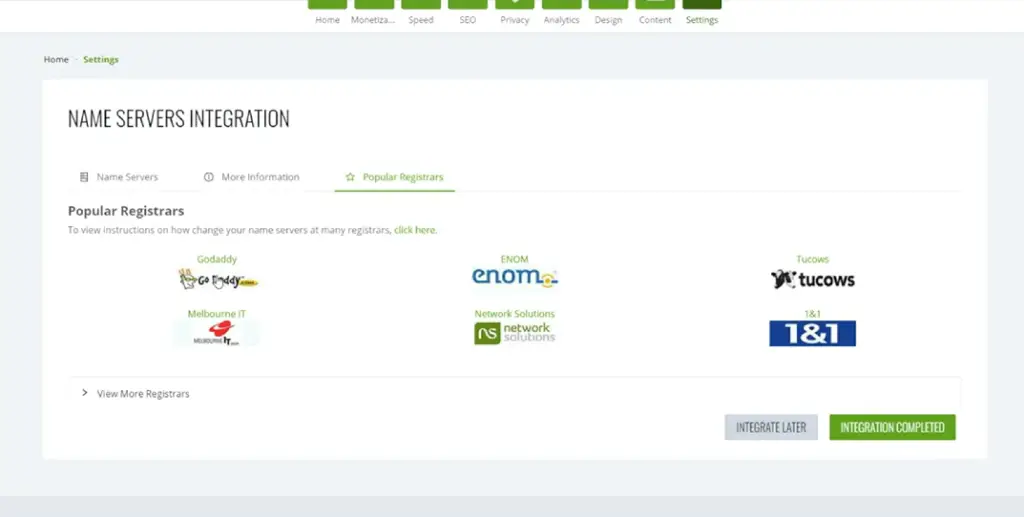
You can also navigate to the popular registrars page to search for your registrar and find instructions on how to update your name servers. Once you change your name servers to point towards Ezoic, the system will remain off for about 12-24 hours to allow the name server to fully propagate. After that you can turn system on and begin testing.
Keep in mind that changing name server just allows Ezoic to act like a proxy. It does not change your current hosting, registrar, or the way you upload and create content.
Summarized Steps for Cloud Integration via Name Servers:
1. Log in to your Ezoic account and click “Integrate Your Site”
2. Select the Cloud Integration Option.
3. You will see a simple table with your current name servers on the left and custom Ezoic name servers we’ve generated for your site on the right. Update your site’s name servers to the Ezoic ones at your registrar or host (wherever they are managed)
Option 2: Ezoic Cloud Integration through Cloudflare
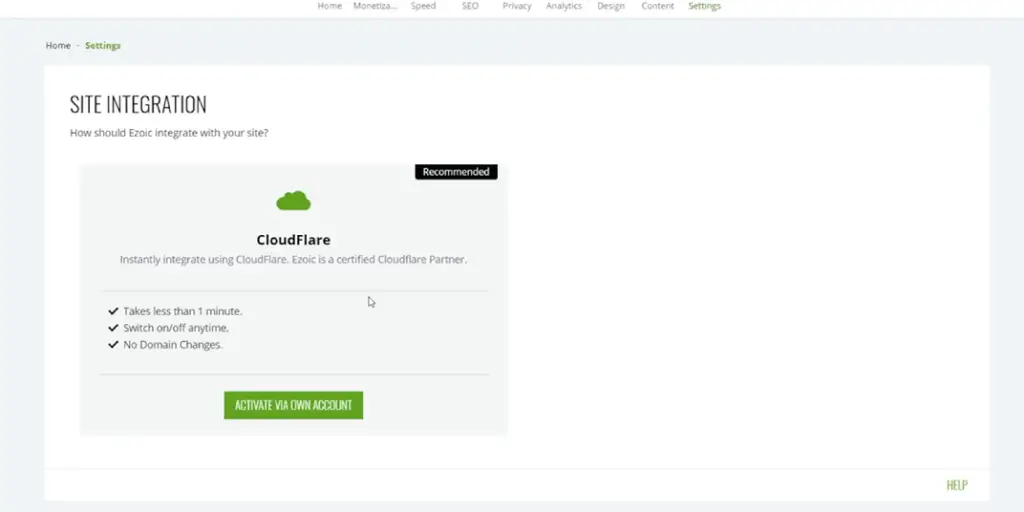
Connecting via Cloudflare is the easiest and fastest way to connect to Ezoic. If you are an existing Cloudflare user, you can connect to Ezoic via our Cloudflare app. Ezoic is a certified CloudFlare partner which means you can connect with Ezoic instantly by simply installing the Cloudflare app and inputting your CloudFlare credentials.
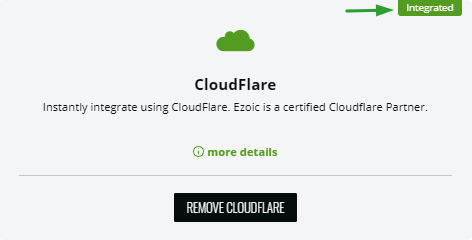
When you create an account, Ezoic will detect if the site is using the Cloudflare CDN. From there you will be prompted to enter your Cloudflare credentials which will give Ezoic temporary access to the Cloudflare DNS and point your site to Ezoic. When it is fully completed, you will see a green flag that says Integrated.
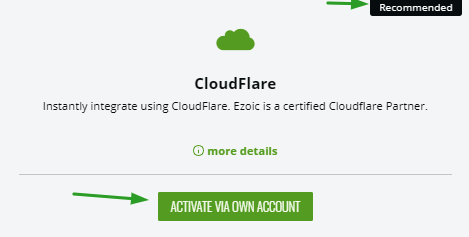
If CloudFlare still requires you to log in to integrate, you will see a black flag in the top right corner that says “recommended”. Simply click the green button that says “Activate Via Own Account”
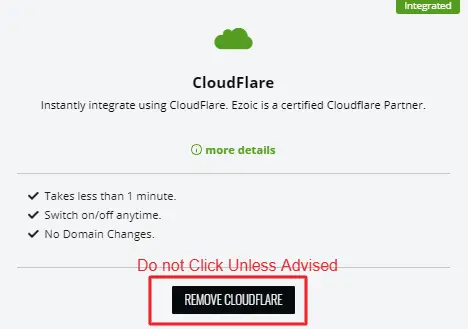
Keep in mind that if you intend to integrate via CloudFlare, you should never click the black button that says “Remove CloudFlare Integration” unless advised and recommended by a member of the Ezoic staff.
Upon completion, click on “Integration Complete” If you don’t see a green checkmark after integrating, click the green text shown at the end of the instructions for details. In many cases, integration simply takes a little while to propagate across the web.
The benefit of Cloudflare is that it takes less than 5 minutes, it can be turned off anytime, and you get to benefit from CloudFlare and Ezoic simultaneously.
Summarized Steps for Cloud Integration via CloudFlare:
1. Install Cloudflare App
2. Connect with Ezoic instantly by inputting CloudFlare credentials
3. Using the encrypted keys we’re able to connect your site to Ezoic via CloudFlare
4. Takes less than 5 minutes and can be turned off at any time
Handling SSL With Ezoic
When integrating with Ezoic, we need to make sure that Ezoic has the correct configuration set up so that the site is secure on both the original setup and Ezoic version. Check the steps below in order make sure your SSL settings are automatically configured depending on the integration method.
Nameserver Integration
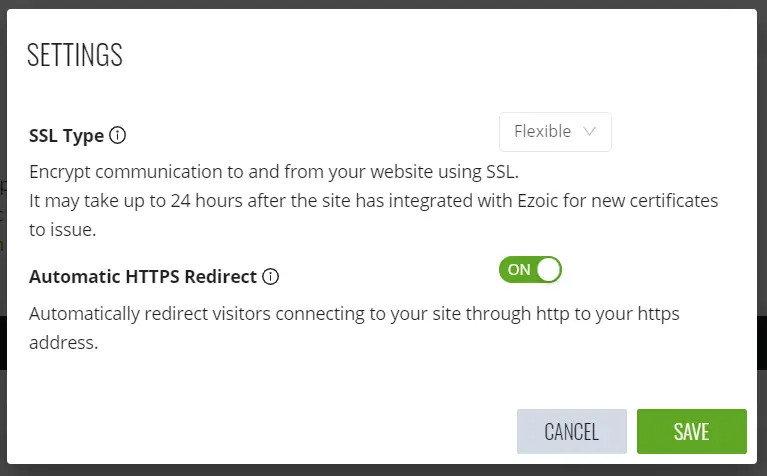
For name server integration, the publisher’s SSL certificate is uploaded onto the site’s server if the publisher already has a pre-existing SSL certificate. Ezoic uses the SSL certificate, decrypts the request, then makes a call using HTTPS to your origin server to get the website’s contents and to optimize the page. The full SSL Type option is chosen for this situation.
For publishers without a pre-existing SSL certificate, they can initiate a HTTPS request and Ezoic has the SSL certificate to be able to decrypt the request. Ezoic makes a call using unencrypted HTTP to the website’s origin server to return all of the contents. Ezoic will optimize the page, encrypt all the contents, and return all this information back to the publisher. The flexible SSL Type option is chosen for this situation.
Cloudflare Integration
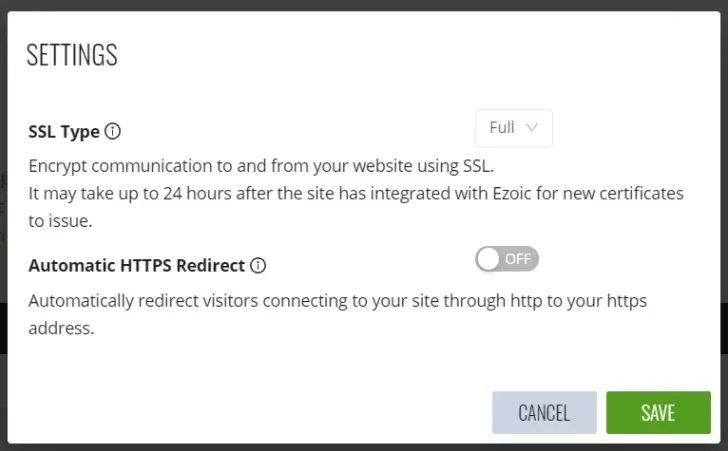
For integrating through Ezoic’s Cloudflare App, if you have the SSL provided by Cloudflare you need to confirm that Ezoic reflects these settings at Cloudflare as “Strict”, “Full”, or “Flexible”.
Full
For the full setting, the client initiates an HTTPS request which goes to Cloudflare first. Cloudflare will decrypt this request and forward it to Ezoic as an HTTPS request. Ezoic also has the SSL certificate and decrypts this request. Ezoic will then make a call using HTTPS to the site’s origin server to get the content, optimize the page, and then return the content to Cloudflare, who will then return this information back to the user. The SSL Certificate/Key are uploaded to Ezoic or SSL app is installed in Ezoic’s dashboard.
Flexible
For the flexible setting, the client initiates a HTTPS request which also goes to Cloudflare first. Cloudflare decrypts the request and then forwards to Ezoic as an HTTP request. Ezoic receives the un-encrypted request and then makes a call using HTTP to the site’s origin server to get content, optimize the page, and then return the content to Cloudflare. Cloudflare encrypts the response and returns the response back to the user. No action is required in the Ezoic dashboard.
Strict
For the strict setting, a publisher with a pre-existing SSL certificate and is using Cloudflare may see that the settings are set to strict. Just like the full setting, it works in the same way but it means that the origin SSL certificate must be valid. In this case the client also initiates an HTTPS request and the request goes to Cloudflare first. Cloudflare decrypts the request and forwards it to Ezoic as an HTTPS request. Ezoic has the SSL certificate and decrypts the request. Then, Ezoic makes a call using the HTTPS to the site’s origin server to get content, optimie the page, and return the content back to the user. For strict, the origin certificate is valid, unexpired, issued by a trusted certificate authority, and contains a common subject alt name that matches the requested host name.