

Time:
4-8 hours
Total estimated time needed to complete the effort from start to finish
Difficulty:
7/10
Development or WordPress expertise needed to complete project
Prerequisite:
SFTP Access
Sites will need access to their website files via SFTP at their host
How It Works
This project is for WordPress sites that would like to show basic posts or pages in a faster theme without changing the core theme for their whole website. It is not a good fit for sites that require the functionality of a lot of plugins or page builders on all their posts or articles (i.e. use an affiliate product inserter/styler plugin on +50% of posts).
When To Try
Many sites have very straightforward posts or content articles that simply include images and text for the most part. These sites may have themes or pages that require more sophisticated themes to produce the design for the whole site.
The Details
This project will focus on how WordPress sites can migrate all/most of their WordPress articles or posts to a new WordPress instance with a lightning-fast theme inside of their current WordPress site (domain). It will also allow the site to keep its existing database without upgrading hosting plans or doing complicated db migrations.
Considerations
You will have to redirect all the pages/posts to a subfolder with this new theme, so if your article right now looks like this… website.com/blog-title/ to website.com/new/blog-tile/. This will also require you to log in and manage two separate WordPress instances, which may feel like a big pain.
Why It Works
Moving all of the articles/posts to a new WordPress instance with a fast/basic theme inside of a new sub-folder in the existing domain offers the ability and flexibility to deliver readers faster pages that pass Core Web Vitals without changing their current theme for the whole website.
Ezoic Users
Changing themes can impact revenue; as Ezoic AI will have to relearn on pages that you install the new theme on. You can prevent this by using Ad Inserter to insert existing placeholder codes into the new theme. This guide can help. Be sure to let support know about the change.
Just want the fast theme and plugins?
If you only wish to download the fast child theme of Twenty-TwentyOne and the fast plugins that allow most sites to completely recreate and build pages the way they would using extravagant page builders, you can ignore the entire tutorial and simply download the theme and plugins below (otherwise, wait and we’ll show you when and how to download them in the tutorial).
Theme
Requires default WordPress Twenty Twenty One theme installed. Once installed, upload and activate this one.
Plugins
It is recommended sites use no other plugins with these for any site features to prevent conflicts and fast functioning.
Ezoic User Note: If you attempt to simply install this theme and plugins, you’ll need to re-customize your site. Ezoic users will also need to account for the theme changes as outlined above.
LEAP TIP: Deactivate all caching, speed optimization, and image serving/compression plugins when using this theme, these plugins, and Ezoic Leap.
The Full Project Starts Here
[Important] Always create a full site back-up prior to a project like this.
Getting started
First, you’ll want to ensure you have access to all the components necessary to complete the project in its entirety so that you don’t end up wasting a few hours getting 80% of the way done with the project.
These will be linked to as we walkthrough here, so don’t worry:
Files / Downloads / Tools
- Download file of WordPress CMS
- All the Plugins available below
- Get Our Custom Twenty Twenty One Theme
- FileZilla (free) or similar file software
- SFTP credentials or access via host
- Tool/access for URL redirects
Connect to your website via SFTP at your host
Connecting via SFTP at your host will allow us to create a new folder that is outside your current WordPress instance and install a new WordPress site in this sub-folder.
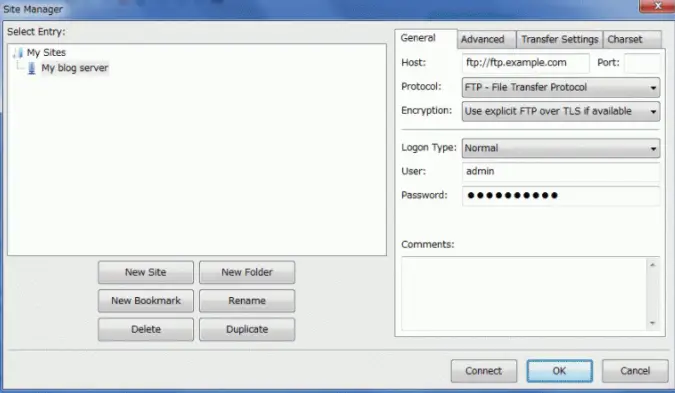
FileZilla
A free tool for connecting to your website files via SFTP connection at the host.
WordPress
You’ll need to download this file no matter what. This will download WP v5.7.1.
Download FileZilla and the latest version above. If you have another file management software you prefer, you don’t have to use FileZilla.
No matter what, you’ll need to download the latest version of WordPress above as well.
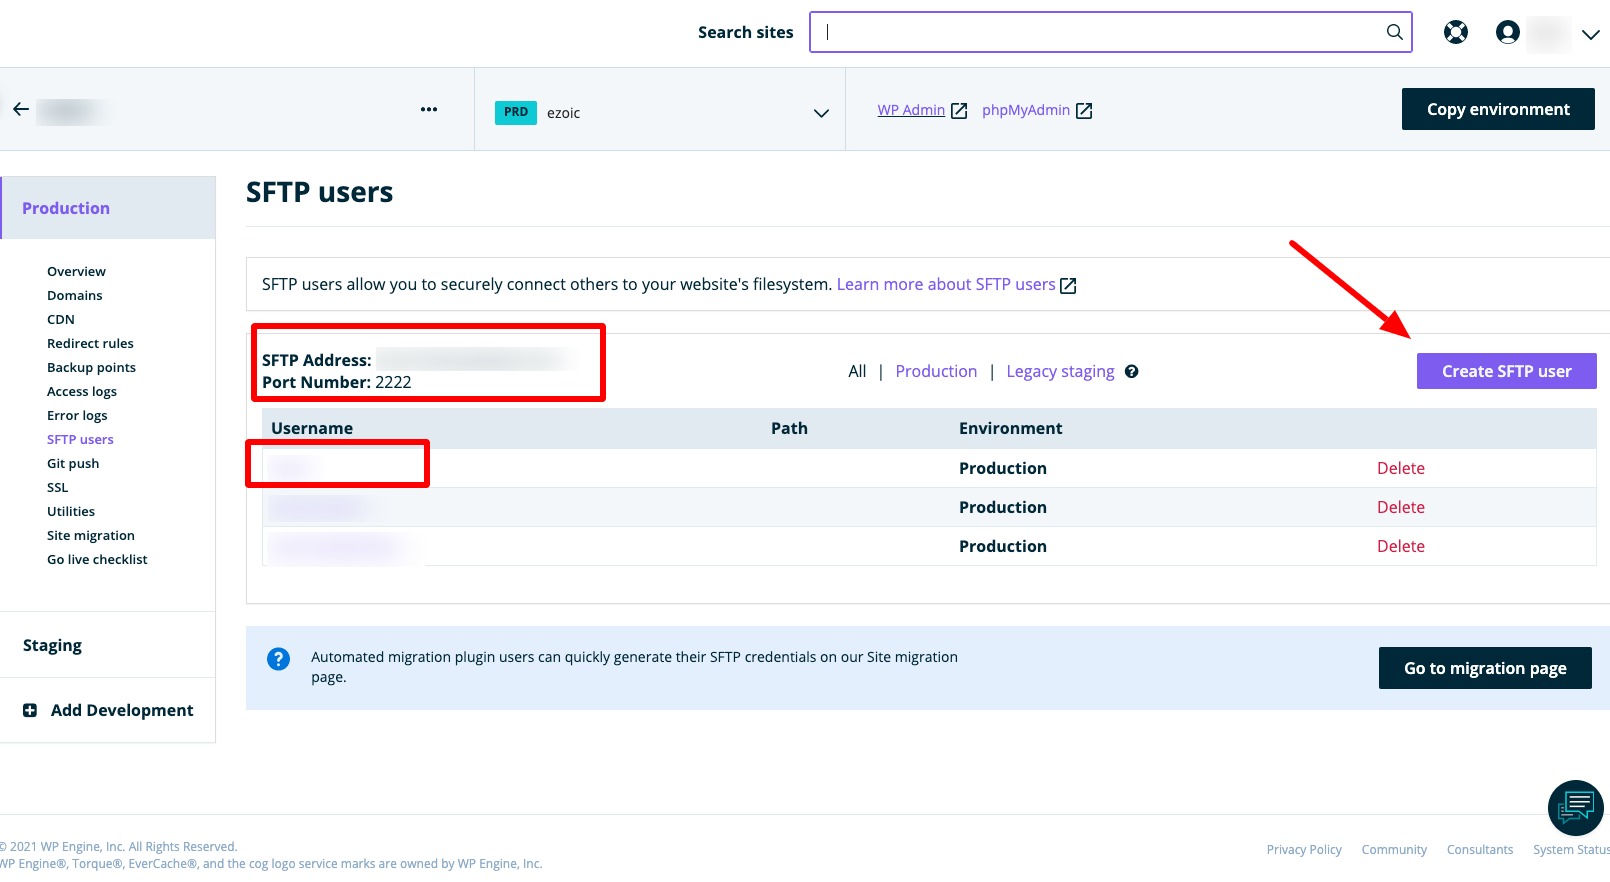
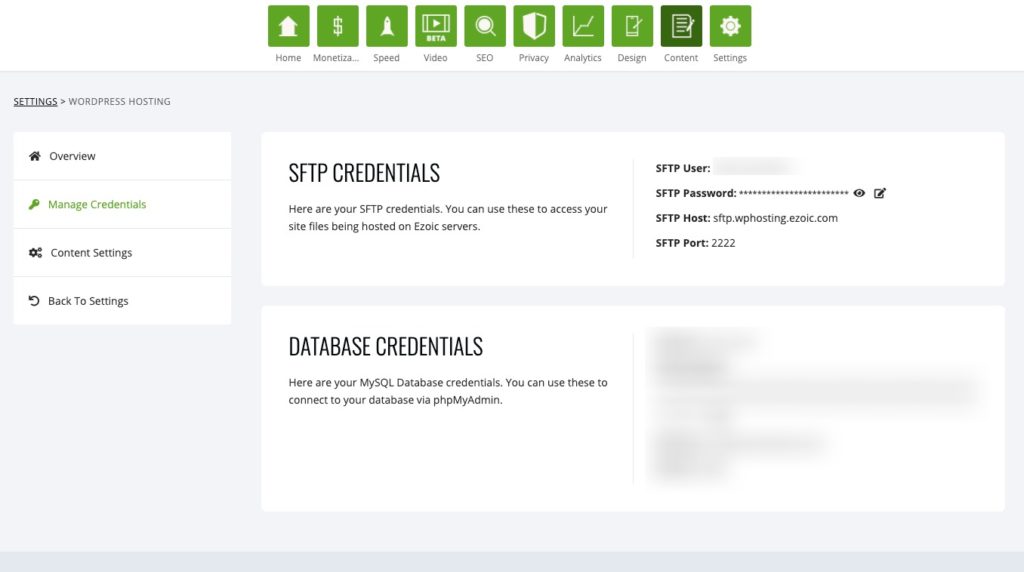
Locate SFTP credentials or access at your site’s host
This is usually located somewhere in the menu of your hosting admin screen.The screen shots below are of where this is located at WPEngine and if a site has moved to Ezoic’s free hosting, but there are thousands of hosts and all provide the info a little differently. Most will have support articles available on how to establish this connection.
Now, open you FileZilla software and follow the tutorial or the quick setup to establish an SFTP connection to your WordPress website.
We did a tutorial on how to connect to SFTP with FileZilla here with Ezoic’s hosting, but it’s pretty much the same everywhere.
Creating a new home for our fast pages and theme
One you establish an SFTP connection, you should see your website files. Depending on your host configuration, you’ll have a file that says root, or even better, “html”, that you need to click on to get to all your core WordPress files.
The video above shows the following steps to take next.
1.) Click/open the “html” folder
2.) Right click and create a new directory (folder)
3.) Name the directory something you don’t mind being in your slug for these pages
Should appear as /Html/–[yourentry]/
For our example, I’m just going to call this “fast” (the video below uses “articles”)
Example if I named my folder “fast”
/html/fast/
Note: whatever you name this will be what we redirect these pages to at the end….so pick something you like. And yes, I know the common discussion about SEO and sub-folders but in this case, you’ll have to assume that the benefits of UX outweigh any small addition to your URL length.
Prior to the last step in the video, you’ll need to customize 1-2 things from the WordPress file we downloaded to make it work for your site.
4.) Unzip the WordPress package you downloaded
5.) Go back into FileZilla. Open your site, click on the “HTML” folder” and navigate to the wp-config file in your existing WordPress theme.
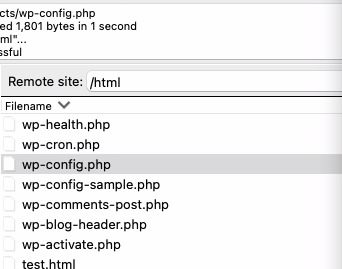
6.) Download the wp-config.php file in your current site (it will be inside the HTML folder)
7.) Make a copy and change out just a few characters… //where it says $table_prefix = wp_’
//where it says

$table_prefix = 'wp_'

//change the 'wp_' to '[name of the folder you created]_" to this instead

$table_prefix = 'fast_'

// It ^ should look like that in the copy of the wp-config file now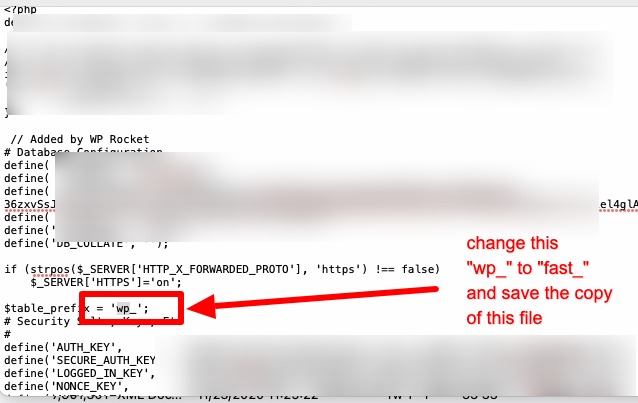
8.) Go into your unzipped WordPress file that you downloaded from this page and unzipped. Save the wp-config file we just customized in step 7 in this folder (which should be labeled WordPress). Replace the wp-config file if one exists in there, but there should be one in the file you downloaded above… only a file that says wp-config_sample; which can be left in there.
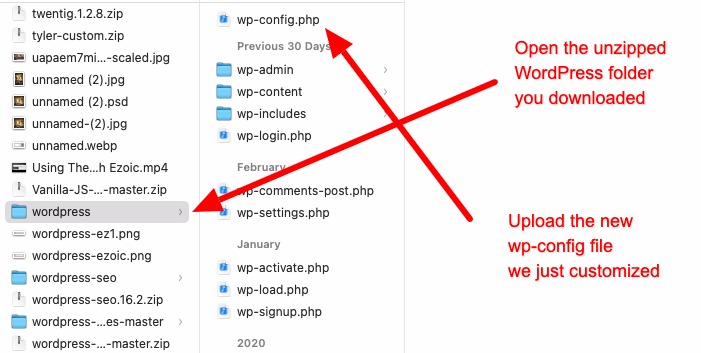
9.) Now, we are ready for the last step in the video… we are going to upload the whole WordPress folder we just added our modified wp-config file to. We will do this in FileZilla.
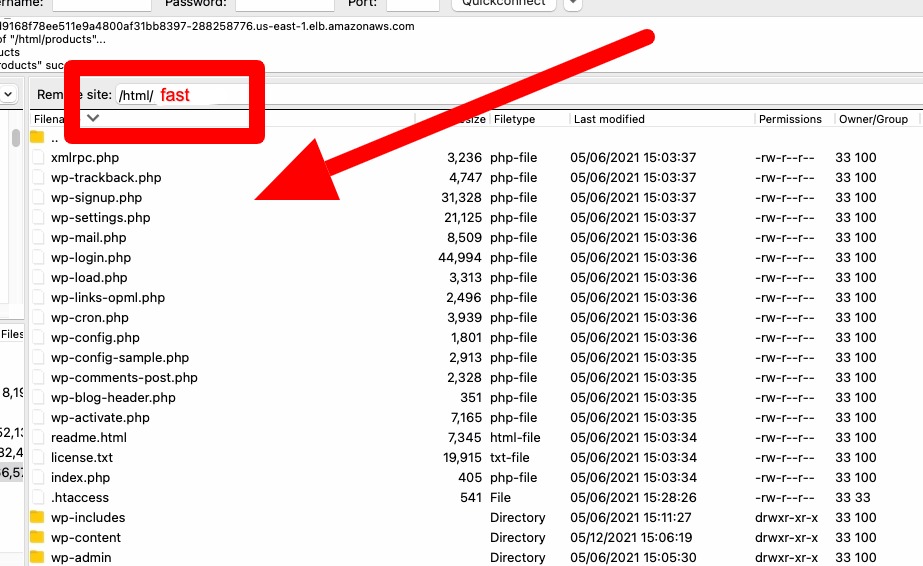
10.) Back inside FileZilla and your html folder, scroll down and find the new Scroll down and open the folder with the name you just created (in the video it was “articles” and in our example above it was “fast”
11.) Open the new directory by double-clicking it and then upload the entire WordPress folder we downloaded, unzipped, and added our modified wp-config file to…
… it may take a little while to upload (5-10 minutes)
Once complete, it should look like this… (html/fast will be html/[whatever you name your folder]/ for your site)
Setting up your fast WordPress instance
To login and setup your new WordPress site, than now lives inside of your existing site, go to…
www.yourwebsite.com/ [name-of-directory-you-chose] /
In our example it was… www.examplesite.com/fast/
This will prompt the WordPress wizard to begin and it should take you to a WordPress admin login screen at …
www.yourwebsite.com/ [name-of-directory-you-chose] /wp-admin
In our example site it was …www.examplesite.com/fast/wp-admin/
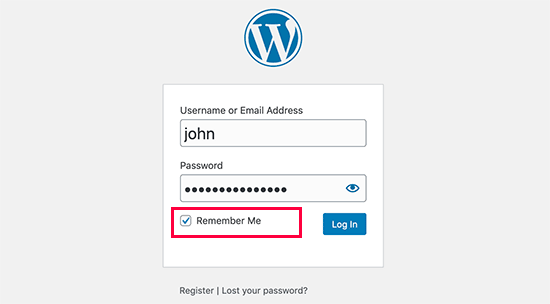
The only user account in this new WordPress site will be connected to the email setup inside your WordPress site. You can use that email to do “forgot my password” to reset your password (just for this new WordPress instance) and login.
Congrats, you now have a new WordPress site inside your existing one we can now customize with only fast themes and plugins. Next, we’ll export the pages or posts that don’t need a fancy theme/plugins from your current site and bring them in here once we complete setting up the site.
Plugins
Plugins that allow for recreating most of a sites design in a new fast theme.
Theme
Custom child theme that will work with these plugins to largely keep your current design.
Download and install the theme and plugins above
[ IMPORTANT — IN YOUR NEW WORDPRESS INSTANCE (THE ONE WE JUST MADE), NOT YOUR EXISTING WEBSITE]…
…Download and install the plugins and theme available above
The theme is a custom child theme that works with Twenty-Twenty-One (WordPress should have included this theme by default).
1.) Download and install the theme first. Then, activate it (note, you’ll need to install the Twenty Twenty One theme if it’s not in your instance for some odd reason).
2.) Download and install the plugins above. You’ll have to unzip the file you downloaded, BUT DO NOT unzip all the zipped files inside the file you downloaded.
Next, download and then upload all the plugins above in your wp-admin Plugins area one at a time.
You can choose to exclude RankMath if you wish, but it offers many of the same features as Yoast but is less bloated and won’t slow down your site. If you don’t use any SEO plugins like this, you can ignore it.
3.) Activate the plugins and navigate to Customizer under Appearance in Wp-Admin

4.) This is where you can use the provided plugin and custom theme options to recreate the “brand” or styles you prefer for your website. Don’t worry, there’s no content in here yet, so if you don’t feel like you can get it right without some pages in here, feel free to wait.
SETUP NOTE: I strongly recommend never changing the font type from default. You can change font weights and sizes, but changing the font type could try to call Google Fonts, which have been disabled, so the site will not actually show them if you select them somehow.
Time to move choosen pages/posts to your fast theme
Exporting the correct content is the first step of the process and can be done with tools directly in WordPress.
Login to your existing WordPress site (the one with all your pages and posts in it that you’d like to move).
Be sure to preform the export from this site.
1.) Login to the wp-admin of the source site. Hover over Tools and click Export.
2.) Choose the exact pages/posts that you are comfortable moving the new theme (you can always start with a few, and move more later)
3.) Should you choose to export posts only, keep in mind that featured images will not be carried over and must be manually imported again on the destination site.
4.) Click Download Export File

Import content into your new fast theme
Importing requires you’ve first exported the necessary content correctly. You should have a file downloaded from the previous step that you wish to import before beginning.
Be sure to perform this step on the new WordPress instance we created ( ex. — /fast/wp-admin).
Login to the new instance:
1.) Go to Tools in admin
2.) Click Import
3.) Click WordPress
4.) Click Install Now and/or Run Importer
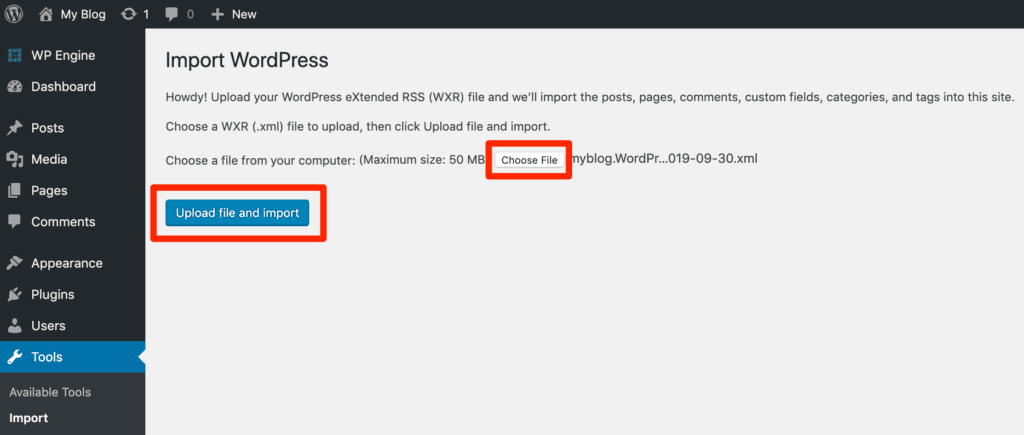
1.) Browse your computer for the exported XML file exported from your current site and select it and click Upload File and Import.
2.) Select the name of the Author user that will be assigned the posts and pages (you may need to recreate your author’s names or ids here… but can also do this later as well).
3.) Download and import file attachments and click submit.
Redirect the pages you moved
Last, make sure to redirect your URLs using your existing (not new) site if you manage redirects in WordPress.
you’ll simply need to redirect pages from …
Existing URL — /post-title/
Redirect to — /fast/post-title/
(fast is what we used, but if you picked another folder… you get it… use that name)
There is a really easy regex rule that should do this for all pages, if it makes sense for how you run redirects.
Source: ^/(.*)
Target: /fast/$1

// (note: check to ensure this regex works for you and ensure to use your folder name - in our example we used "fast"
Congrats, you are running two themes on one domain
You can now return to your Customizer if you’d like to finish setting up your site.
Did you try this? How did it go?